Settings for KWHotel Booking Engine
Do you have any questions regarding KWHotel functions or development?
>>>Ask them here

Attention! Please make sure that all data is configured in the KWHotel Pro, prior to setting up the KWHotel Booking Engine. It is required to:
- create room groups and assign rooms to them – the detailed manual can be found here,
- create or set an existing rate plan to be used in KWHotel Booking Engine – details can be found here.
The manual includes:
- Configuring display settings
- Configuring email notifications
- Payment settings
- Additional options
- Adding roadmap to your hotel
- Placing a hotel logo
- Creating room search categories
- Creating discount codes
1. Configuring display settings
All settings related directly to online reservation system (this excludes room and rate plan setup), should be performed in the online panel of KWHotel, available here: https://dev.kwhotel.com/#/login. You can log there via the Administrator panel, using credentials received from KWHotel Team to your authorised email address.
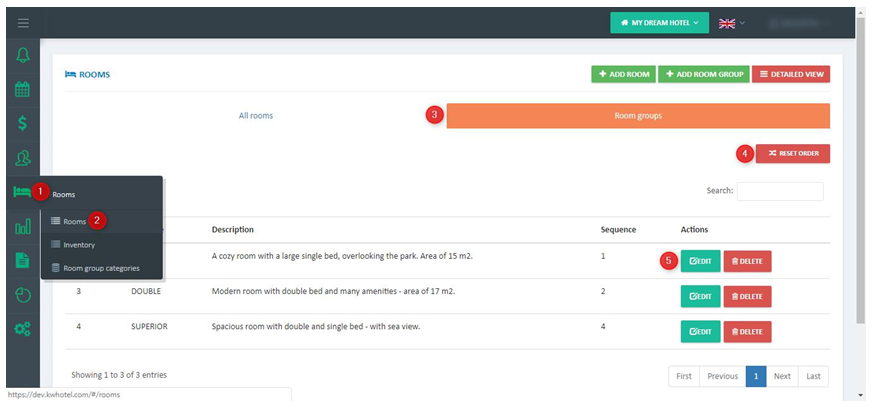
1.1) Let us begin with configuring room groups. Using menu on your left, please click Rooms (1) > Rooms (2), then the Room groups tab (3). We highly recommend clicking the „Reset order” button first (4). Now we proceed to editing each room group (5).
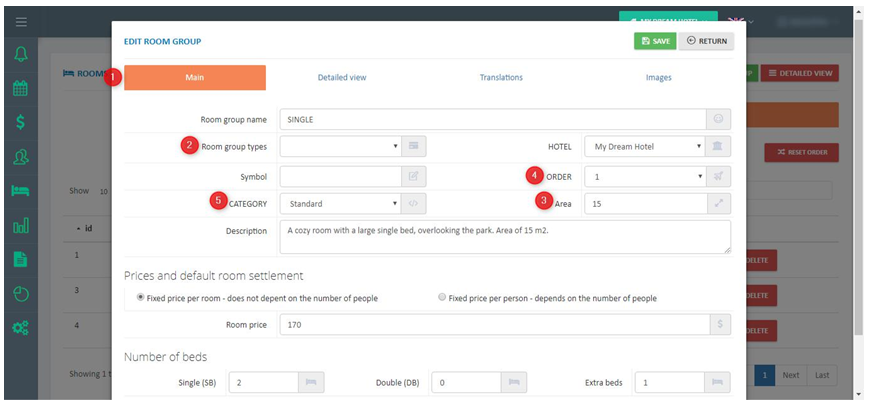
1.2) After clicking the „Edit” button, a window containing four tabs will appear, allowing to configure the selected room group. In the first tab – „Main” (1) – you can select a room type (2), define a room size (3) or change the order of displaying this room group in the booking engine (4).
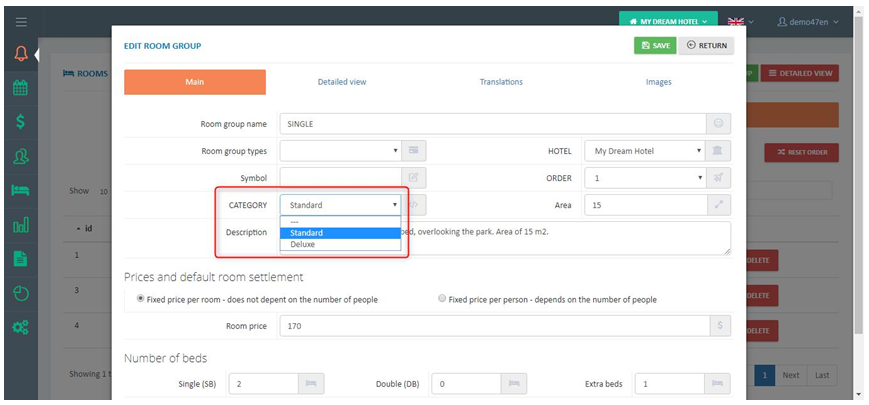
Additionally, it is possible to assign category to the selected room group (5). Categories will be explained in detail in the chapter 4. of this manual.
The remaining data – such as the number of beds – is downloaded from the desktop version of KWHotel.
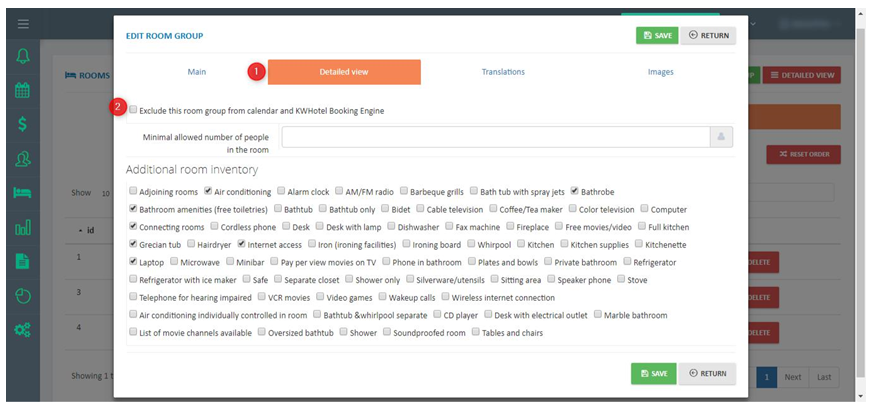
1.3) In the next tab – „Detailed view” (1) – you can disable the given room group from being sold via Booking Engine. If checkbox (2) is selected, group will not be visible in the KWHotel Booking Engine.
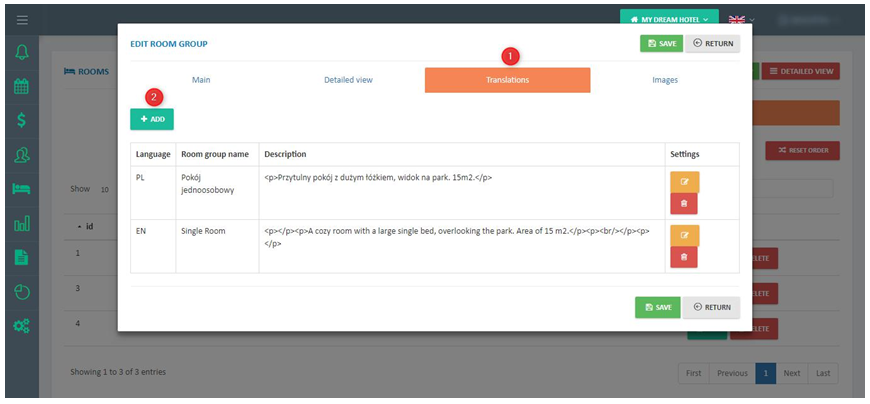
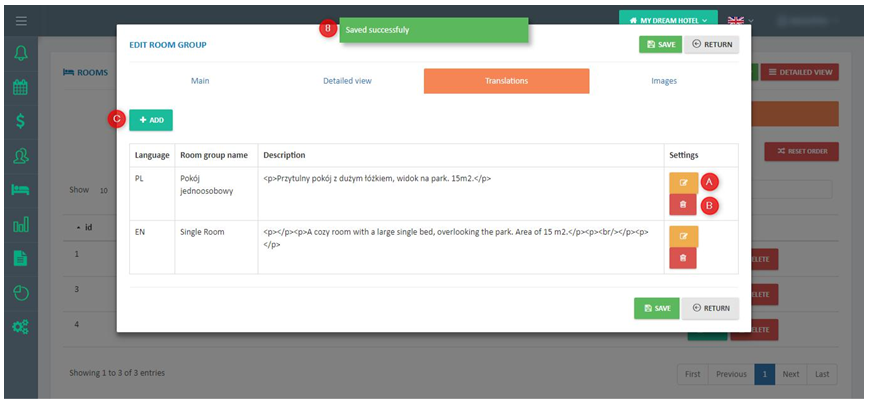
1.4) In the third tab – „Translations” (1) – it is required to insert descriptions for the selected language versions. Click „Add” (2).
A new window will appear, allowing to insert a room group description (3). First we define which language version will the description be made for – to do so, we insert a two character abbreviation of the given language (4).
Attention! All language abbreviations must be inserted as capital letters (EN, PL, etc.).
KWHotel Booking Engine supports the following language versions:
Polish (PL), English (EN), German (DE), Russian (RU), French (FR), Greek (GR), Italian (IT), Norwegian (NO), Latvian (LV).
Now insert a room group name that will be displayed in the booking engine (5).
After that we type the room group description (6) and save changes (7).
1.5) Having clicked „Save”, a message about successful saving should appear on the green background (8)
The yellow button allows you to modify the selected description (A) while the red one allows you to delete it (B).
The „Add” button lets you insert room group description in another language (C).
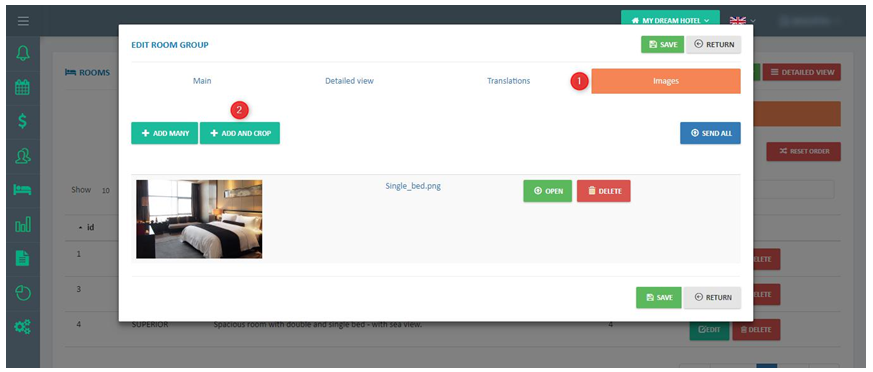
1.6) The fourth tab – „Images” (1) – lets you upload images that will represent the given room group in KWHotel Booking Engine. We recommend using the “Add and crop” option (2).
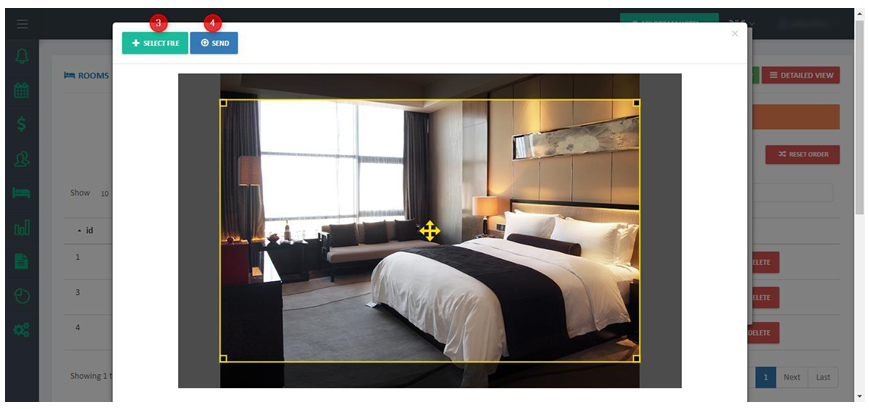
1.7) Please upload a file first (3), by pointing out a file to upload and clicking „Send” (4). Once image was loaded, you can upload another one. The size of each uploaded image cannot exceed 10 MB.
1.8) Having uploaded several photos, you may sort them (determining the order of displaying them in KWHotel Booking Engine) using the „drag & move” method:
To finish the process, press the „Save” button (5).
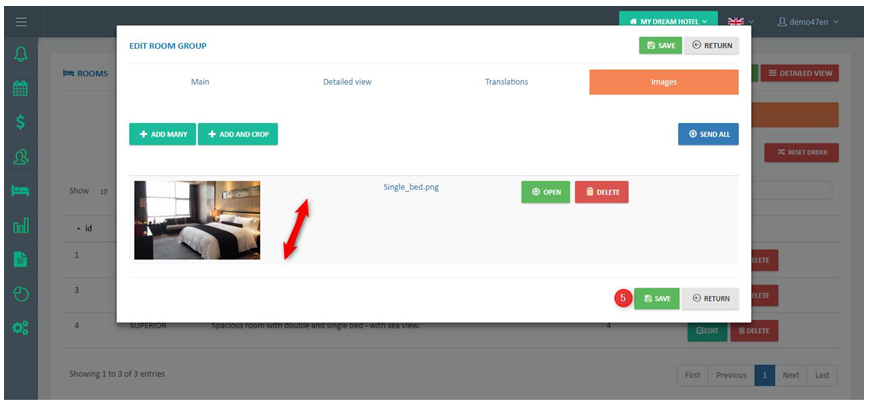
Attention! If you are unable to save configuration of the given room, please make sure that in the “Main” tab there was any value inserted in the “Order” field.
1.9) In the next step proceed to Configuration (1) > Hotel (2) and configure the following data :
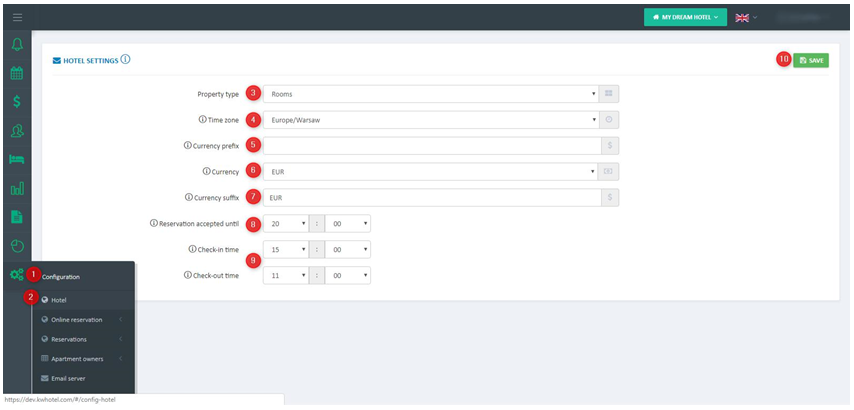
Depending on the property type, please select whether to display information about rooms / apartments / beds or cottages (3). Now please select a time zone (4), currency (6) and determine where – before amount (5) or after amount (7) – should it be displayed. Now insert the hour, starting from which reservation is possible in your hotel (8). Finally we insert the check-in and check-out time (9) and save settings (10).
1.10) In the Configuration (1) > Online reservation (2) > Settings (new) (3) it is required to configure the elements displayed in the KWHotel Booking Engine.
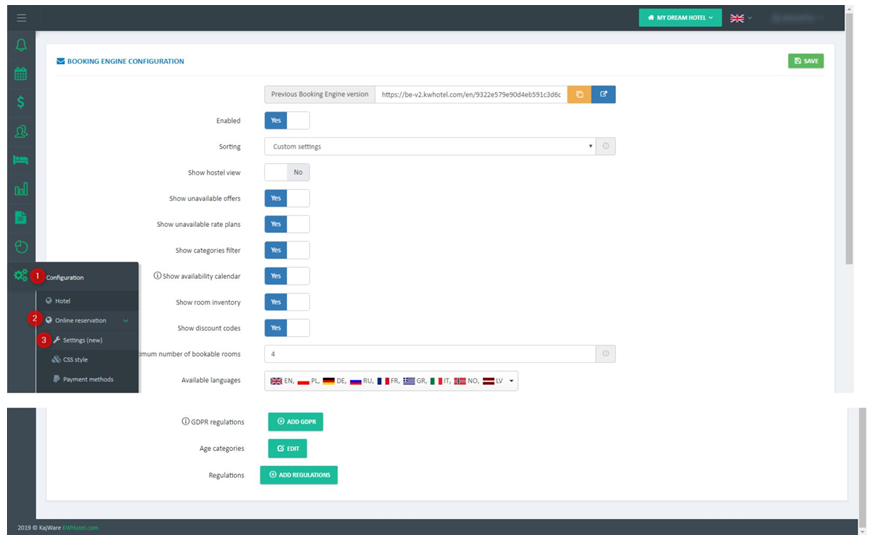
Link to the reservation system includes the current link to KWHotel Booking Engine. It is used for the sake of implementing it on a property`s website. The „Copy link” button (A) copies link to your computer`s memory, while the „Proceed to page” (B) opens KWHotel Booking Engine in a new tab.
The Enabled button determines if KWHotel Booking Engine is active. Disabling this option prevents your customers from making a reservation via the Booking Engine.
Sorting lets you set the order of displaying room groups in KWHotel Booking Engine. The „Custom settings” option is related to the „Order” parameter, available when editing a room group.
Show hostel view modifies the way reservations are made in KWHotel Booking Engine. Instead of choosing a number of people, you need to reveal a price list of the given room type and select the number of beds you wish to book. In such case a proper room configuration is required in KWHotel Pro (creating room types such as “Bed in an X-people room” and assigning as many rooms to them as you have beds in each room).
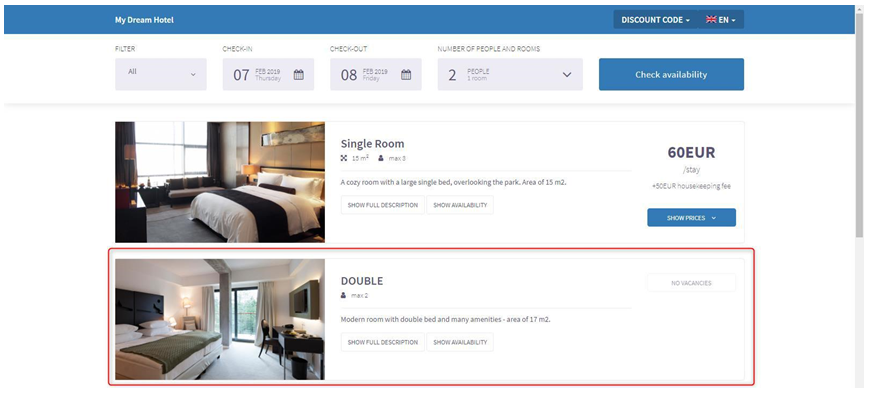
Show unavailable offers lets you display offers which are not available in the term your guest wishes to book (i.e.there are no vacancies). The unavailable offers look as follows:
Show unavailable rate plans allows you to display rate plans which are not available in the given term.
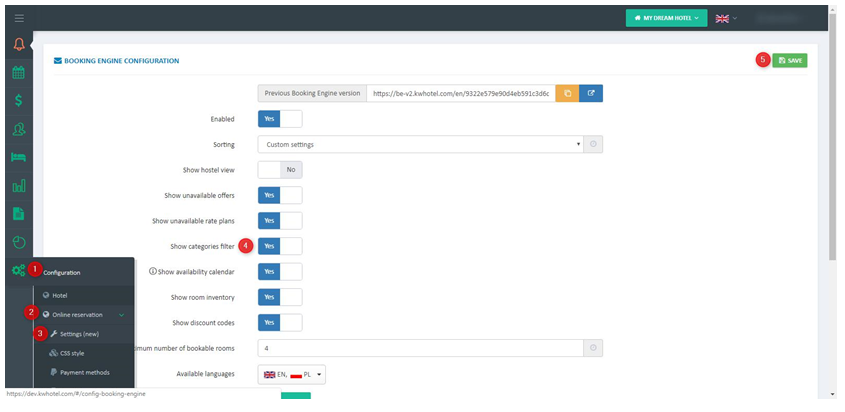
Show categories filter disables the categories filter in the KWHotel Booking Engine. More information on the categories can be found in chapter 4. of this manual. The categories filter looks as follows:
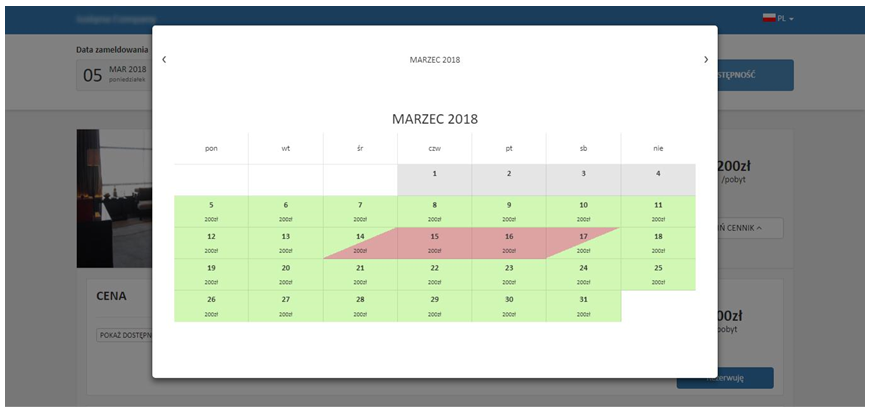
Show availability calendar enables the „Show availability” button in the KWHotel Booking Engine. It can be seen in two spots:
- by clicking the „Show availability” button located in the room group description menu, a calendar will be displayed showing information about vacant terms in the selected room group.
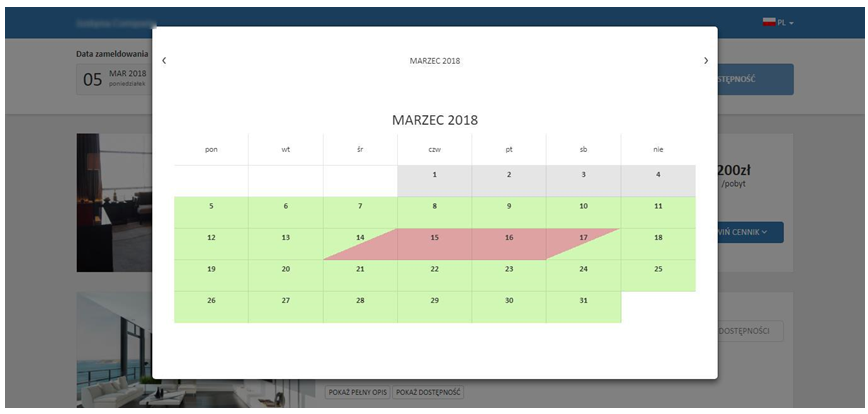
- a similar button can be found when you reveal the rate plan`s details. However, it also displays prices for each day:
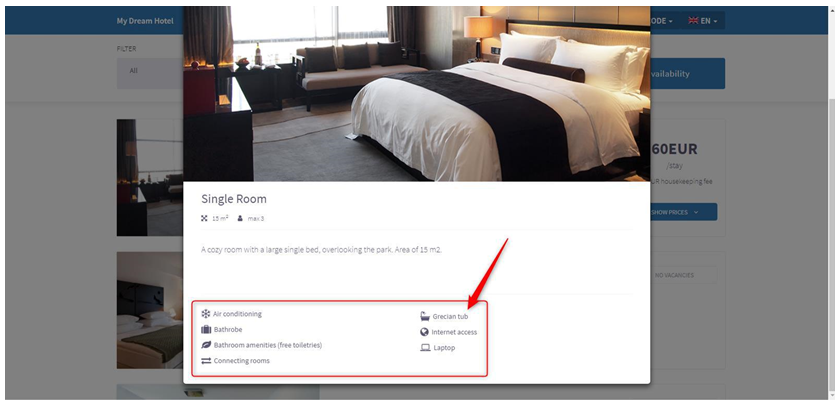
Show room inventory displays room inventory in the KWHotel Booking Engine.
Show discount codes will allow your customers to type a discount code in the KWHotel Booking Engine. More information on the discount codes can be found in chapter 4. of this manual.

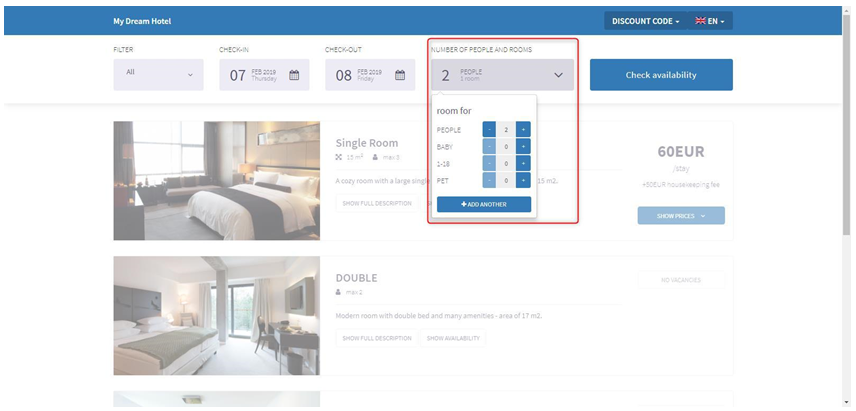
Maximum number of bookable rooms determines the number of rooms that can be booked at once. If value “0” is inserted, it will not be possible to book more than one room at once (the “Add another” button will be hidden):
Available languages is a place where you can point out the language versions supported by the KWHotel Booking Engine:

GDPR regulations lets you type GDPR regulations of your property. They will be accessible by a customer in the second step of reservation process in the KWHotel Booking Engine. Accepting the GDPR regulations is obligatory to complete a reservation process.
Additionally, typing your GDPR regulations will cause information regarding the Data Administrator to appear as well.
Age categories let you include up to three additional groups of people / pets / units that can be a part of a reservation process.
Regulations option lets you insert regulations of your property. It will be displayed to guest during the second step of a reservation process. Accepting them is obligatory to complete a reservation process.
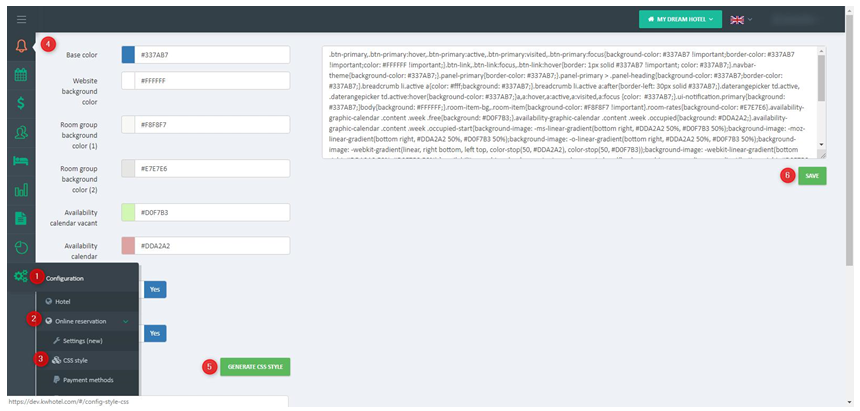
1.11) In the Configuration (1) > Online reservation (2) > CSS style (3) it is possible to change a colour scheme of the Booking Engine and adjust its appearance to match the aesthetics of your website. You can define colours for each of the elements (4) and then press the „Generate CSS style” (5) > „Save” (6).
2. Configuring email notifications
For a proper functioning of the KWHotel Booking Engine, 8 different notification templates must be prepared. We can find them in the Configuration (1) > Online reservation (2) > Notifications (3).
2.1) The notifications system supports 4 statuses, each of them describing a different state of reservation (scheduled, confirmed, cancelled, not paid). Each of them generates two messages – for your guest and for your staff. Templates must be inserted in accordance with the descriptions provided in each tab – (4). To create a template, press the „Add” button (5).
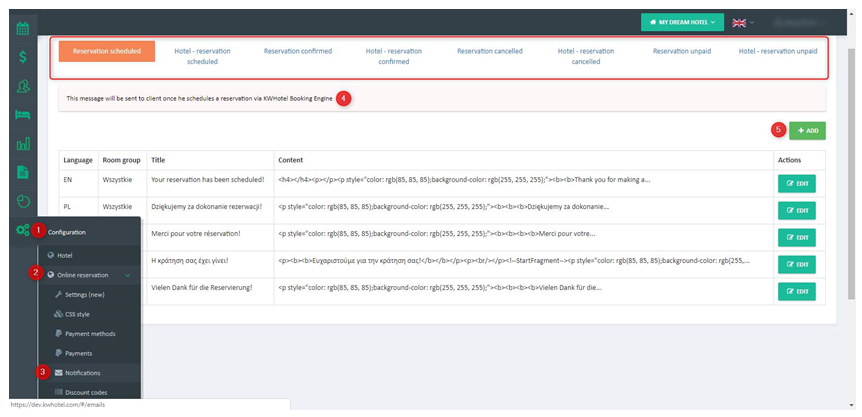
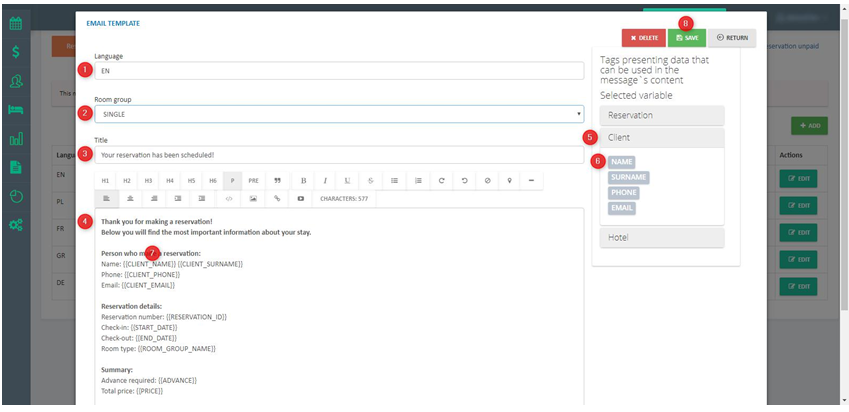
2.2) In the notification creation window you must define its language first (1) (two character abbreviation, only capital letters). Now we choose whether this template shall be generated for all room groups or for a single one (2). Now type the title of a notification (3) and its content (4).
When creating templates it is possible to use parameters located in the right side of the screen. Click the given group of parameters (5), select one of them (6) and click in the spot where you want the parameter to appear (7). When generating a message, parameters will be replaced with real reservation data.
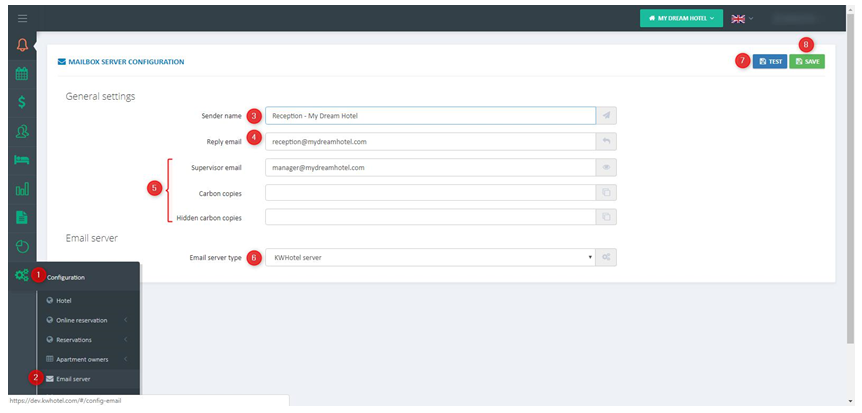
2.3) To unlock sending notifications, you must first configure email server in the Configuration (1) > Email server (2).
First define a sender name (3) and email address (4) that will be used to generate a message to your guests and where their replies will be sent to. It is also possible to insert additional email addresses (5). Server configuration can be left intact (6).
Attention! As a server type you can also select “SMTP type”. In such case please insert data of your own mailbox. This solution is recommended in case where “KWHotel server” option doesn`t work with your KWHotel Booking Engine.
Having inserted data you can verify connection by clicking the „Test” button (7). If a success message is displayed, you can save changes (8).
3. Payment settings
KWHotel Booking Engine supports both offline and online payments.
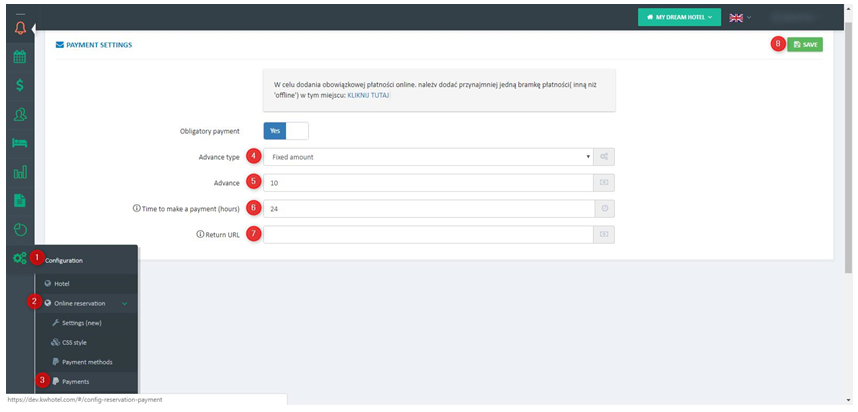
3.1) In the Configuration (1) > Online reservation (2) > Payments (3) please select the type (4) and value of advance payment (5). It is possible to define either an amount of advance or its percentage value. It is also required to provide a time limit (6) within which the advance must be paid.
Attention! If the advance payment time is up and reservation status does not change from “Reservation scheduled” in KWHotel Pro, the reservation will be cancelled. Information regarding the cancellation will be sent to both customer and your staff, according to notifications you set up in chapter 2. Additionally, reservation will be deleted from the KWHotel Pro calendar.
The „Return URL” field (7) should be left blank – in such case, when reservation is made, your customer will see an information about reservation status and a corresponding template will be displayed to him as well (according to points 2.1-2.2). You can also define a different forwarding here.
Once you have inserted data, press the „Save” button (8).
3.2) Now proceed to Configuration > Online reservation > Payment methods.
3.3) In the following window you can define one or several payment gateways (including the offline one) – to do so, please click „Add” (1).
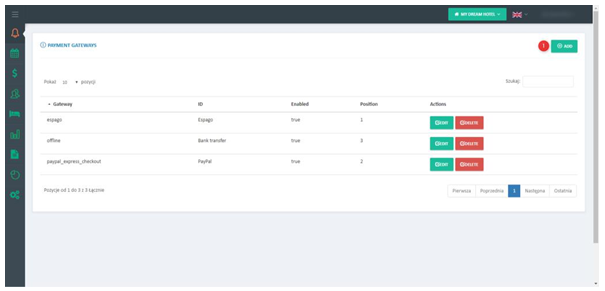
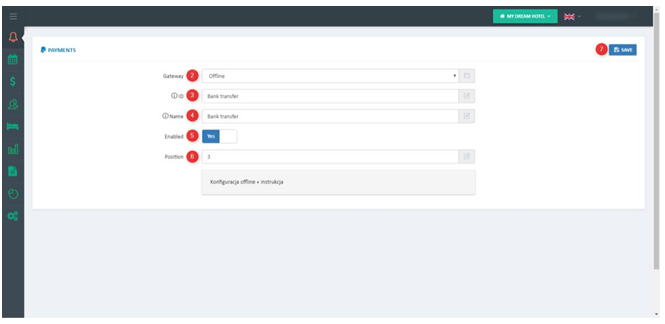
3.4) When configuring offline payments (2) you can define a name that will be displayed in the Booking Engine (3). The ID field (4) lets you type a name that will be displayed in the payment gateways` list in the web panel (point 3.2).
What are the offline payments? These are payments which are NOT MADE via payment gateways – for instance on the spot payments or bank transfers count as offline payments.
When using multiple payment gateways, it is possible to set their order of display (5). You may also temporarily disable one of them (6). Having configured all settings, press the „Save” button (7).
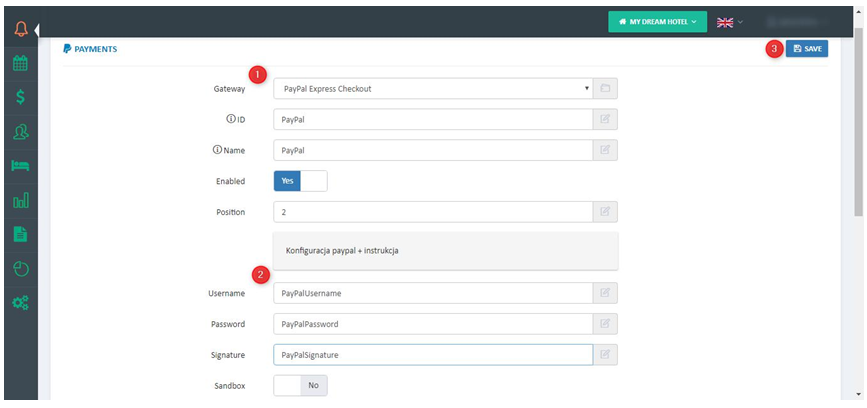
3.5) Having created an account for one of the payment gateways, you may now enable online payments. First select a payment gateway provider (1), insert his shop parameters (2) and click „Save” (3). For example:
4. Additional options
4.1 Adding roadmap to your hotel
4.1) In KWHotel Booking Engine you may insert a roadmap leading to your property.
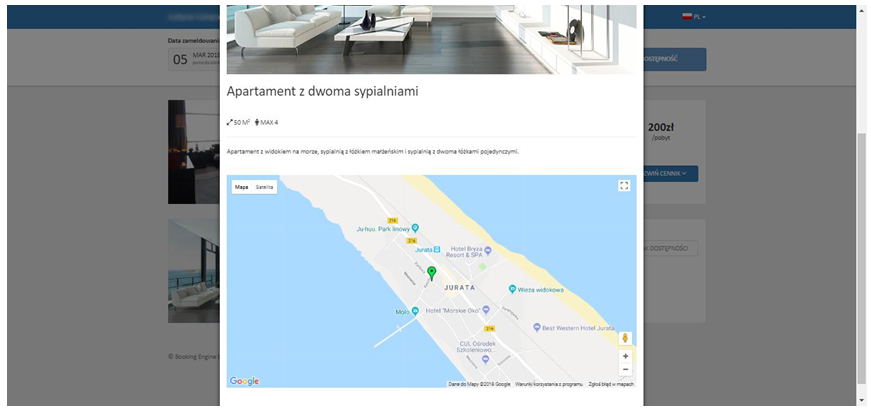
To do so, a special parameter must be added in the description (Rooms > Rooms > Room groups > Edit > Translations tab > Add or Edit). Parameter can be configured by selecting a spot where we wish to place our roadmap, then clicking the location icon (1) and inserting data regarding the latitude (2), longitude (3) any by determining how much the roadmap should be zoomed in (4). Now you may save the changes (5).
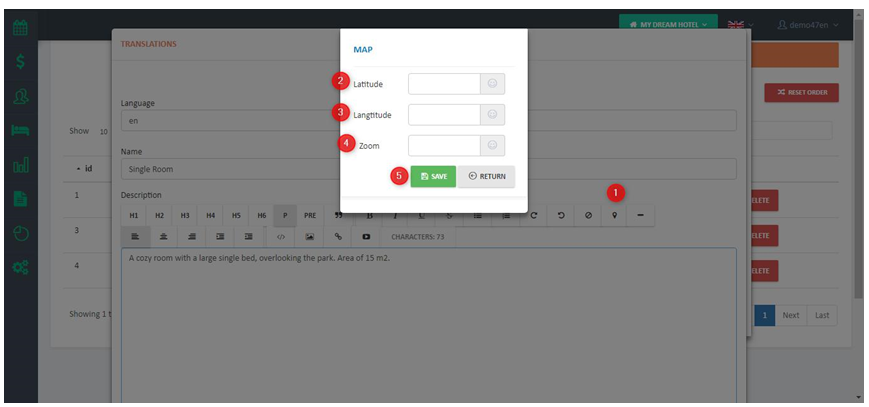
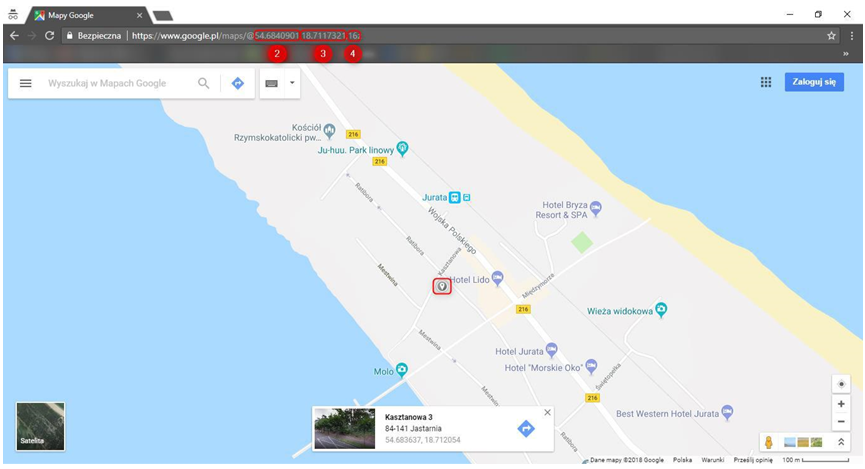
Such data (2, 3, 4) can be found i.e. in the Google Maps link:
4.2 Placing a hotel logo
4.2) Aside from configuring the CSS colour scheme it is also possible to place your hotel logo.
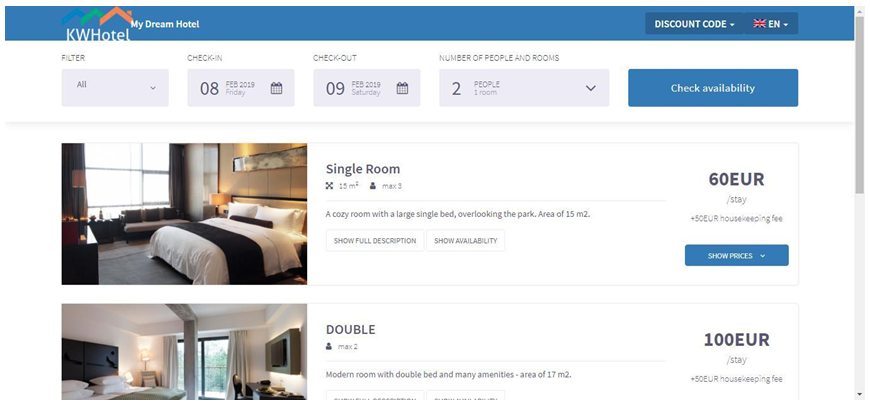
Just proceed to Configuration (1) > Online reservation (2) > CSS style (3) > click the „Generate CSS style” option (4) > in the code field (5) insert the following line (6):
div.navbar-header{background:url(http://XXX.png) no-repeat !important; background-size:contain !important; padding-left:110px !important;}
– where the part highlighted red must be replaced with the path to your logo file. Now click „Save” (7):

4.3 Creating room search categories
4.3) KWHotel Booking Engine lets you create customized search categories and filters, which i.e. define the location of your apartments.
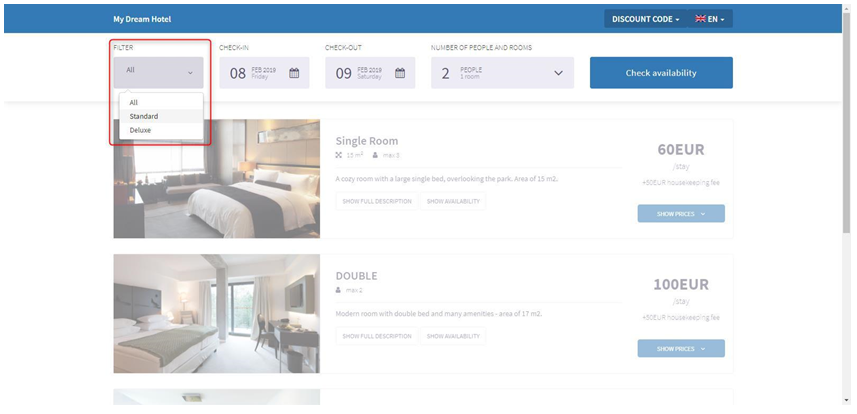
Categories can be set up in Rooms (1) > Room group categories (2) > Add (3).
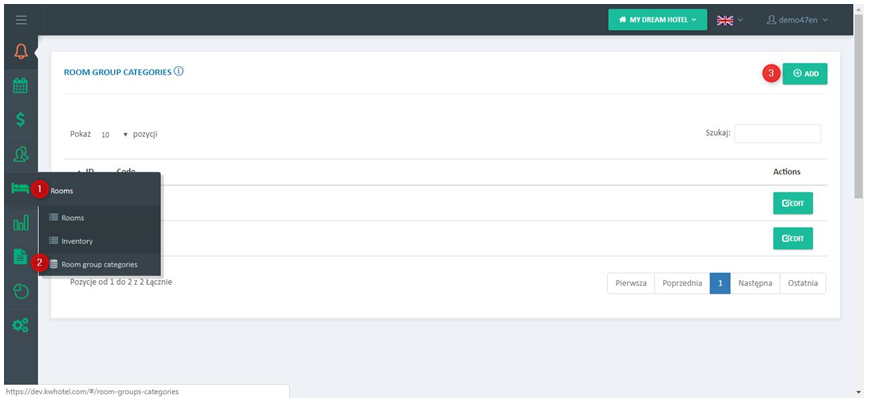
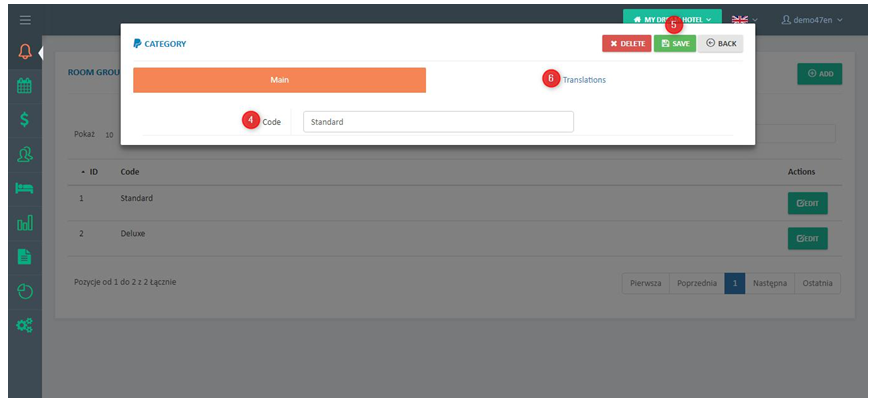
In the „Code” field (4) type the category name and then click „Save” (5). You may assign multiple translations to each category. This can be achieved by using the „Translations” tab (6).
To assign a room group to a single category, proceed to – Rooms > Rooms > Room groups tab > Edit > Main tab > Category tab.
The last step requires us to enable category display in Configuration (1) > Online reservation (2) > Settings (new) (3) > Show categories filter (switch to „Yes”) (4) > save settings (5).
4.4 Creating discount codes
4.4) This function lets you generate discount codes for your guests, which can be redeemed when searching for offers in KWHotel Booking Engine.
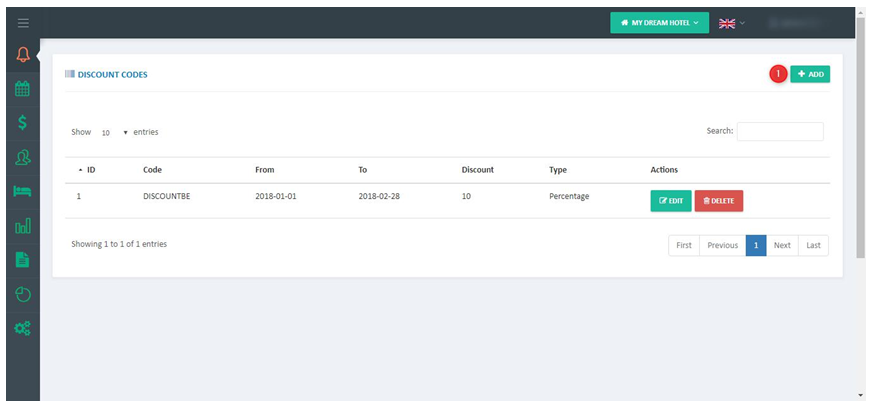
Discount codes configuration can be found in Configuration > Online reservation > Discount codes.
To add a new discount code, click the „Add” button (1).
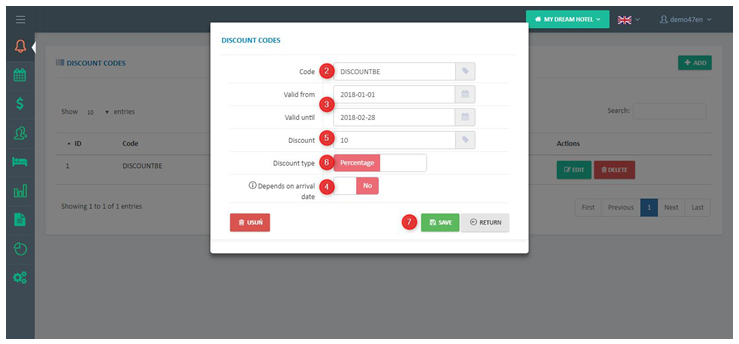
In the newly opened window insert the discount code`s name (2). Typing this code by your guest will activate the discount (provided all conditions are met). Now insert a date range (3) when the discount code will be taken into account by KWHotel Booking Engine. This date range is fully related to the „Depends on arrival date” field (4).
How does the „Depends on arrival date” field work?
NO – discount is valid only within days set in „Valid from” and „Valid until”.
YES – discount can only be activated for a reservation falling between ‘Valid from” and „Valid until” range.
At a first glance, both options do not differ much. That is why it is worth checking the examples below:
EXAMPLE 1:
Valid from: 1.02.2019
Valid until: 7.02.2019
Depends on arrival date: YES
When your guest can activate a discount code: Guest can activate a discount code at any time but his reservation must begin and finish within the 1.02.2019 – 7.02.2019 date range (i.e. from 3.02.2019 to 5.02.2019)
EXAMPLE 2:
Valid from: 1.02.2019
Valid until: 7.02.2019
Depends on arrival date: NIE
When your guest can activate a discount code: Guest can book a reservation for any time (i.e. 5.06.2019 – 8.06.2019), but he must place his booking between 1.02.2019 and 7.02.2019, for the discount to be taken into account.
Congratulations! You have successfully configured the KWHotel Booking Engine. Your system is ready to be implemented on your website. You may perform such implementation on your own or purchase such service from us.
Once you have determined the date range and rules of your discount code, it is time to insert a discount`s value (5). Value can be either percentage or amount-based (6). Now save your changes (7).
Click here to download or print full manual. Additionally, you may find the instruction on how to implement the system onto your webpage here.
The online panel for version 0.47 can be found here.
Other required settings:
When just starting out with KWHotel it is important to remember that KWHotel Pro and the Booking Engine are connected. Due to this, there are a few settings that must be completed in the desktop version first of all. Rooms, room groups, and rate plans are the basic settings on which both programs run on.
The manual for creating rooms and room groups may be found here, while the manual for rate plans is linked here.


