


Setting/editing document templates for automatic sending
Do you have any questions regarding KWHotel functions or development?
>>>Ask them here
1. How to add and send your own document in KWHotel
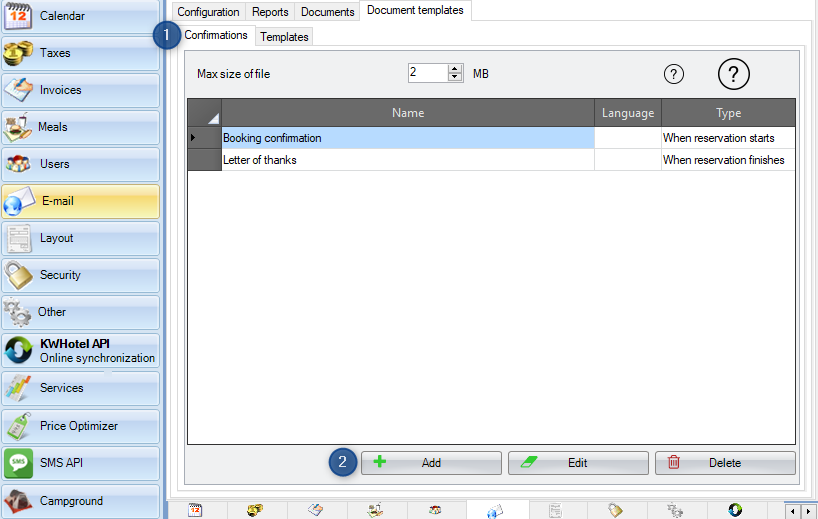
Step 1. Go to Tools > Configuration > Email > Document templates > “Confirmations” tab.
Step 2. Press the “Add” button. It will open a message sending creator.
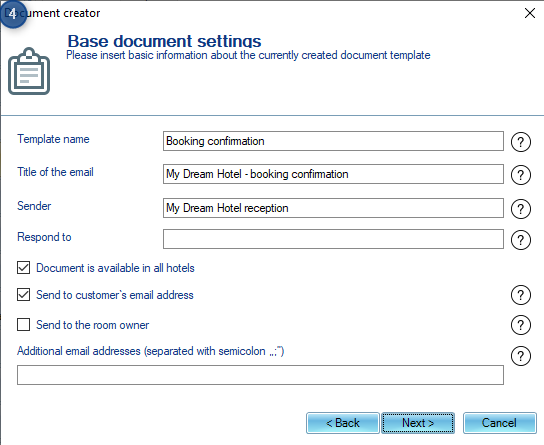
Step 4. Perform the following actions:
insert the template name: it will be displayed in a reservation window > Issue document.
insert an email title: it will be displayed to your customer in his mailbox.
insert sender name: your customer will know that message was sent by your property.
in the “Respond to” field insert email address where you want to receive your customers’ replies.
select if the given message will be available in all properties: this option is useful when several hotels are located on the same database. If you do not wish other properties to use the given template, just switch this option off.
define the recipient of the template: it is required to select at least one of the options below to proceed to the next step of template configuration.
Option A: “Send to customer’s email address” – we use it in case where a hotel guest is the target recipient.
Option B: “Send to the room owner” – we use it in case where the target recipient is not a hotel guest but a room / apartment owner instead. Owner’s email address can be set in Tools > Configuration > Users > edit the given user who is a room / apartment owner > Fill in the “Email” field.
Attention! In case of selecting option B, room / apartment that was assigned to the given user – matters. We can check it in Tools > Configuration > Users > edit the given user who is a room / apartment owner > “Rooms visible by this user”.
Option C: “Additional email addresses” – lets you define specific email addresses where the message will be sent to.
For example you can set all messages to be sent to the hotel manager as well.
Having completed the above data, press the “Next” button.
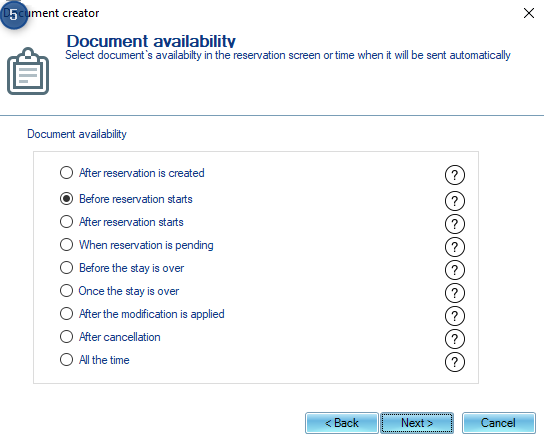
Step 5. Pick the availability of the given message. Such information will be crucial if you enable automated message sending in the next step.
The following availability times are possible:
– after reservation is created
– before reservation starts
– after reservation starts
– when reservation is pending
– before the stay is over
– once the stay is over
– after the modification is applied
– after cancellation
– all the time
There is a question mark next to each of the above options – you will find additional explanations there.
Once you have made your choice, press the “Next” button.
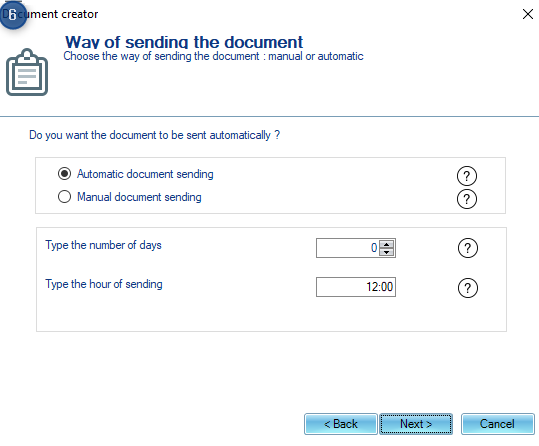
Step 6. Decide whether your message will be sent manually or automatically. Depending on the message availability you selected in the previous step, the automated message sending option will be active or inactive. For instance, if you have selected the option to send message at any time, the automated message sending will be impossible (unable to specify the moment of sending).
If you choose the automated sending, in the next steps you will be able to define the time and criteria for sending your message. Please note that selecting this option causes two additional fields to appear:
– “Type the number of days”: KWHotel will automatically send a message after the set number of days.
For example, if you pick the availability time “Before reservation starts” and type value 3 here, KWHotel will automatically send an email to your client 3 days before the reservation starts.
Attention! You may also type “0” (zero) value; in such case KWHotel will send information immediately after a reservation is created.
– “Type the hour of sending”: KWHotel will automatically send a message at the set hour if KWHotel is running. If KWHotel is switched off, the program will attempt to send the remaining messages once KWHotel is started again.
Attention! You may leave this field empty – in such case KWHotel will send the message immediately after criteria are met. Of course KWHotel must still be switched on; otherwise message will be sent once KWHotel is started again.
If you select the manual sending, template will be available in a reservation window (“Issue document” button). Please note that the template will be visible only when all criteria are met.
Having made a choice, click “Next”.
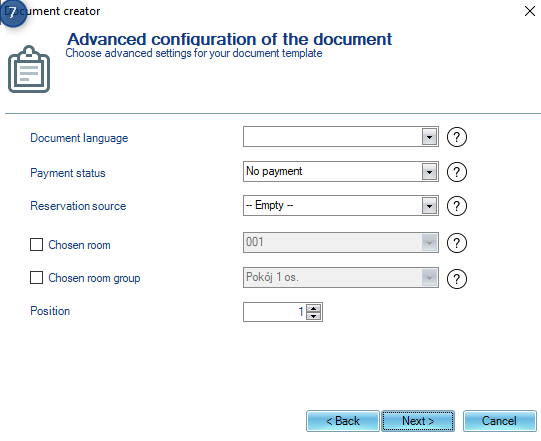
Step 7. Perform the following operations:
– select a message language
– pick a reservation payment status your message will be used for (leaving this field empty will make it available for all statuses)
– select a reservation source your message will be used for (picking the “Empty” option will make it available for all sources)
– select a room your message will be sent for (if you do not select this option, your template will be available for every room)
– select a room type your message will be sent for (if you do not select this option, your template will be available for every room type)
Each of the above options has a question mark next to it – you will find additional explanations there.
Attention! Currently it is not possible to select several rooms or several room types for one template. You may either send the same template for all rooms / room types in one template or create individual templates for each room / room type).
 Step 8. Select a template you wish to use for the currently created message. Template is a combination of content and attachment. You can also skip an attachment.
Existing templates can be selected from the list (A). If you would like to create a new template, press the “New template” button (B). To edit a template you selected from the list, choose the “Edit template” option (C). The manual on how to create templates can be found here.
Once you have finished working on your template and picked it from the list, click “Next”.
